Love those beachy waves but can’t seem to get the right look when using a curling iron? Maybe it’s time to ditch the curling iron, because we are about to teach you how to curl your hair with a flat iron in just four easy steps! We don’t know who came up with this fabulous idea, but we sure are thankful for them. Below are the products that we use and recommend, but you are more than welcome to use similar products that you have at home.
- Oribe Feather Balm
- Oribe Superfine Hairspray
- Oribe Gold Lust Dry Shampoo
- Hair tie
- Clips
- Rattail comb and/or brush
1. Prep Your Hair
Before you start curling your hair, there are several things you can do to not only maximize the effect of the flat iron but also ensure that your hair is being protected since you will be exposing it to heat. First, brush through your hair and remove as many tangles as you can. These little snarls can affect the way the curls come out and may also make your hair more kinky than curly. After brushing, add the Oribe Feather Balm. This will give your hair an airy, feathery look and feel. You can also add a heat protectant spray if you’d like to protect your hair even further. After that, spray all of your hair with the Oribe Superfine Hairspray to achieve a longer-lasting curl.
NOTE: Some people will fully straighten their hair before beginning if they already have slightly wavy or curly hair. This will help keep the flat iron curls as smooth as possible.
2. Split Your Hair into Sections
Depending on the thickness of your hair, you may either want to split your hair into two or three sections, but we don’t recommend not separating it. If you choose not to, there is a good chance that you will miss portions of your hair. To split your hair, take the top layer of your hair (sometimes referred to as the “crown”) and tie that up using your hair tie. Once that is secure, take the second layer of your hair and use your clips to secure it against the first layer. Your third layer should remain down, as this is where you are going to start.
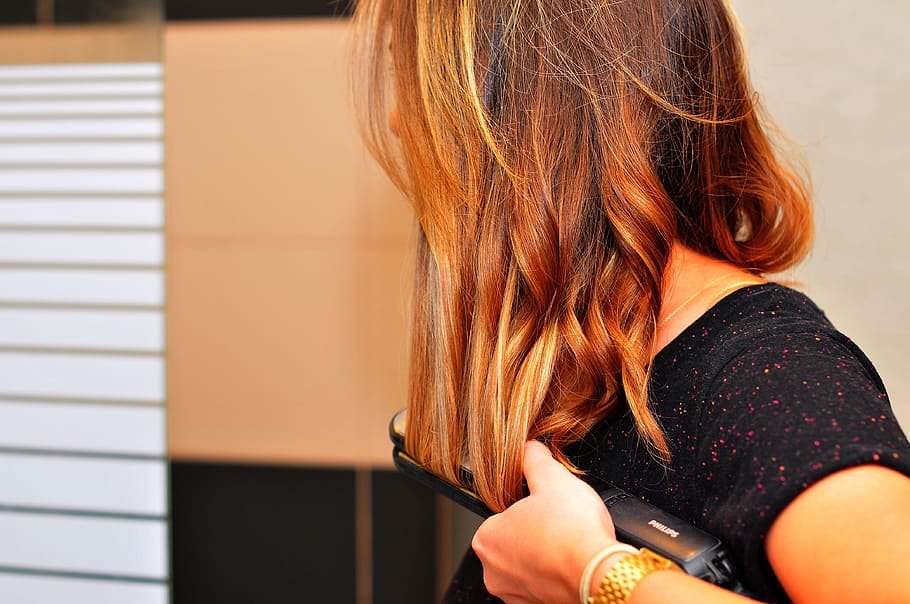
3. Curl Little by Little
Here is where you have to decide how close to the top of your head you want the curls to begin, and also how tight you want the curls to be. The more hair you have in each section, the looser the curl will be. If you intend to have tighter curls, be sure that you do not take too much hair at a time. With each new section, be sure to comb or brush through the hair to ensure there were no tangles left behind.
Once you have decided how tight you want your curls to be and combed through that section, place the small section of hair into the straightener at the starting point. From there, twist the flat iron either toward or away from your face (whichever is preferred) and continue moving the iron in a circular motion until the hair falls out of its grip. If you have achieved your desired look, smooth the end of the curl for a classy and neat finish. Continue to do this until you have curled all sections of your bottom layer.
NOTE: Don’t spend too much time making the bottom layer too curly. This will cause the other layers to “expand” and stick out further than intended.
4. Repeat Steps 1-3
Time to let that second layer of hair down by removing the clips. Leave the hair tie so the first layer stays out of the way. Once you’ve completed steps one through three, you are in the clear to let that last little bit of hair down. You can choose where you want your top layer curls to start, whether that be at the top of your head or closer to the top of your ears. For the final time, complete steps one through three. Don’t forget the back!
Add the Finishing Touches and… Voila!
It’s important to let your hair cool down for a few seconds before adding the optional final touches to your rad new beachy waves. If you have extremely fine hair, use the Oribe Gold Lust Dry Shampoo to add a bit of volume to your hair. You can also do this by teasing the top layer. Finally, top off your look with Oribe Superfine hairspray for a long-lasting hold. With Oribe, a small amount goes a long way.
Now that you have a fun, easy way of getting those beachy waves you’ve been longing for, it might be time to just toss that curling iron and clear up space on your vanity! Stay tuned for more how-to posts like this one and even more tips and tricks from Panache Salon and Spa.